Unveiling the Power of Spark Protocol: A Comprehensive Review
What is Spark?
Spark is a decentralized non-custodial liquidity market protocol where users can participate as suppliers or borrowers. Suppliers provide liquidity to the market to earn a passive income, while borrowers are able to borrow in an over-collateralized (perpetually) or under-collateralized (one-block liquidity) fashion.
Playing around with Spark
We played, we liked, we wrote → that is what this article is; it is our review of the Spark:
Why Spark? Spark is completely market-driven. This means there are multiple scenarios under which you need to test/simulate how Spark Protocol functions. This makes Spark ideal for BuildBear to test it.
Please note, for a thorough review of Spark, it is imperative that we do a test that pretty much covers all the types of transactions that you will execute on Spark. That is the (a) Deposit and (b) Borrow transactions, © the payback, etc etc. However, the MOST important of all is to be able to see the performance of the dApp with the manipulation of the prices and data that impacts our computation. This is WHAT THIS TEST IS ABOUT! It is way larger than you think. We will NOT just lend and borrow; we will manipulate the system to be able to do an edge to edge testing.
We all know that NONE of this is possible on the Ethereum Mainnet (let’s be honest, will we risk the “testing” with real money!! Hell NO!
Yes, we could simply test on the Goerli Testnet, but then:
What about time? Do I wait 1 year to test results? and if I do, will this review be useful at all?
Where are the real tokens? (Do we waste time in creating mock tokens?!?!?, if I must, should I also bother with the prices of these tokens?)
You get the drill. It’s basically a lock-out. Cannot use Ethereum Mainnet and Goerli Testnet.
Could we do the local hardhat fork or anvil fork? Without a doubt. But then, we would need to take some pain in impersonating some account to get some ERC20 Tokens; do some more hacks to be able to “see” our transactions and the outcome of each of those and what not. Hence, {shameless self sell} we utilized BuildBear.io to create a Private Testnet of the Ethereum Mainnet. This allowed us to effectively utilize the Spark front end.
NOTE: Since we are (obviously) a premium user of BuildBear, the chainId that we get from BuildBear is the same chainID that we are forking. Eg, the private testnet that we created on BuildBear (Name: natural-ackbar-c791af0a) also has the chainId 1, since this testnet is a fork of the Ethereum Mainnet.
Set-up before the testing: Using our Private Testnet Faucet to mint 20K DAI

Transaction 1: Depositing 20K DAI into the Spark Protocol
Transaction 2: Borrowing from the Protocol
We borrowed 5ETH using the 20K DAI deposited as collateral. With this borrowing and the math used by Spark Protocol, our Health Factor was 1.68 after the borrowing. Also, the Net APY changed from 0.28% to -1.83%; this is because the cost of borrowing funds is larger than the cost of lending funds and hence, at an aggregate level, we were paying more interest on the borrowing the interest that we were earning (as per our test).

Quick Side Note:
Net APY is the combined effect of all supply and borrow positions on net worth, including incentives. It is possible to have a negative net APY if debt APY is higher than supply APY.
Health factor Safety of your deposited collateral against the borrowed assets and their underlying value. If the health factor goes below 1, the liquidation of your collateral might be triggered.
Liquidation is a process that occurs when a borrower’s health factor goes below 1 due to their collateral value not properly covering their loan/debt value. This might happen when the collateral decreases in value or the borrowed debt increases in value against each other.
The REAL Test
Advancing the time for a year (Using the BuildBear utility tools we were able to Advance time by a year as shown below).

Executing different scenarios
In order to facilitate this, it is crucial to have the following abilities:
The ability to modify the price of assets.
The ability to save the state of the Testnet at different points of testing. This eliminates the need to create multiple Testnets for executing different scenarios. To accomplish this, we have utilized the BuildBear utility tool, as demonstrated below, to create a snapshot of the Testnet at the required points.
1. Case 1: The price of ETH Remains the same || The simplest of the test
No change in the price of ETH token
Repaying the 5ETH we borrowed
Net APY changed from -1.83% to 0.28 %.
Health factors changed from 1.68 to 180.38M.

After withdrawing the DAI, We have received an effective of 56 DAI for the 20,000 DAI we have deposited for 1 year. This closely corresponds to the 0.28% APY shown by the Spark protocol as shown below.

2. Case 2: Manipulating the Price of ETH!!! Reducing the Price by 45% (from 1,803 DAI to 1,003 DAI)
Here is how we achieved this.
To provide some background information, the Spark protocol relies on the Chainlink oracle to obtain asset prices. We have identified the locations where the price is fetched and manipulated as follows:
Firstly, referring to the Spark documentation, we found the Oracle contract address for Eth as EACAggregatorProxy. It’s important to note that this is a Proxy contract. The main contract responsible for storing the data is AccessControlledOffchainAggregator. Upon further inspection of the contract, we discovered that the price details of the token are stored in the s_transmissions mapping.

To identify the storage slot and update the variable to the desired value, we utilized the following code snippet. For a better understanding of the code, please refer to the Solidity documentation.

After executing the above code snippet We adjusted the price of ETH to 1,003.6 DAI as shown below.
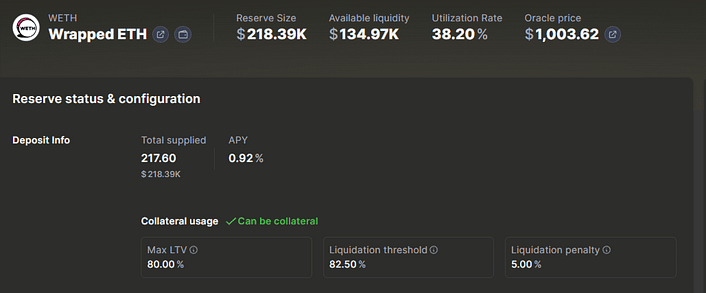
Due to the decrease in the price of ETH to 1003 DAI, the Health Factor increased from 1.68 to 3.02. This is because, the overall “value” of our borrowing position decreased, thereby increasing our collateral-to-loan ratio value.

3. Case 3: Manipulating the Price of ETH!!! Increasing to 3,103 DAI.


As the price of ETH increased to 3,103.62 DAI, the Health Factor reduced from 1.68 to 0.97. This is where the liquidation triggers in!
As mentioned in the docs, when the health factor of a position is below 1, liquidators can (most likely will) repay part or all of the outstanding borrowed amount on behalf of the borrower, while receiving a discounted amount of collateral in return (also known as a liquidation ‘bonus”).
When the liquidation is completed successfully, the health factor of the position is increased, bringing the health factor above 1.
Liquidating the position
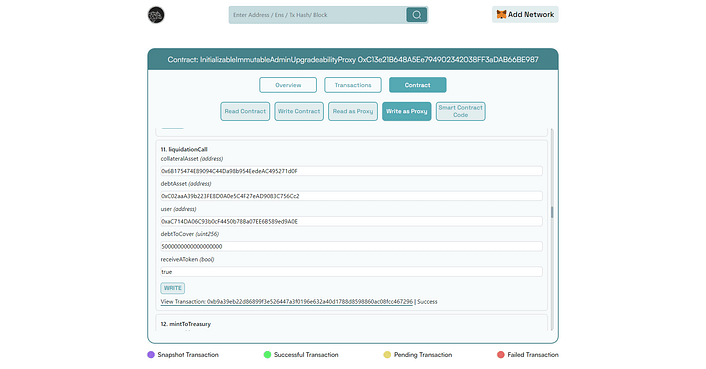
We have used the BuildBear’s inbuilt Explorer to call the liquiditycall() function to liquidity our position as shown in the image below:
Call ParamsData
collateralAssest : address of the collateral reserve.
debt : address of the debt reserve.
User : address of the borrower.
debtToCover : Amount of asset debt that the liquidator will repay.
receiveAToken : if true, the user receives the spTokens equivalent of the purchased collateral. If false, the user receives the underlying asset directly.
After liquidation

Please Note: that even though we chose to pay the entry collateral, only half of the collateral is taken in the liquidation process. This is because a liquidator can only repay up to 50% of a single borrowed amount, as mentioned in the Docs.
During the liquidation process, up to 50% of the borrower’s debt (which amounts to 2.5 ETH) is repaid, and this value, along with the liquidation fee totaling 8,320 DAI, is deducted from the user’s available collateral. As a result, the user’s DAI collateral reduces from 20,000 DAI to 11,679 DAI.
Upon performing the liquidation, the liquidator receives an amount of 513 spDAI, a 5% bonus.
Conclusion:
In analyzing different scenarios, all is well. HOWEVER IT IS CRITICAL TO NOTE, that when the Health Factor falls below 1 (thus, exposing a liquidation) ONLY up to 50% of the borrower’s debt can be repaid!!!!
These scenarios demonstrate the importance of monitoring market conditions and evaluating the potential risks and rewards associated with borrowing and lending activities on Spark. Understanding the dynamics of different market scenarios allows users to make informed decisions and manage their positions effectively.
Overall, we are pleased with our experience using Spark.
Information in this article shouldn’t be taken as Finance Advice.
About BuildBear:
BuildBear is a platform for testing dApps at scale, for teams. It provides users with their own private Testnet to test their smart contracts and dApps, which can be forked from any EVM chain. It also provides a Faucet, Explorer, and RPC for testing purposes.
BuildBear aims to build an ecosystem of tools for testing dApps at scale for the teams.
Do you want your DApp to be reviewed by BuildBear, please reach out to as on Twitter, and LinkedIn and Join the Telegram group


