For Python developers looking to interact with Ethereum, web3.py is the go-to library. This guide shows you how to use web3.py with BuildBear RPC to test, deploy, and manage dApps effortlessly within a realistic testing environment. We’ll also demonstrate how Web3.py, with BuildBear’s RPC, interacts with the PancakeSwap Lottery smart contract on the Binance Chain.
What you will learn:
What is Web3.py?
Web3.py is a Python library that greatly simplifies the way you connect with Ethereum networks. It is similar to what ethers.js and web3.js do for JavaScript, enabling developers to transact with the blockchain.
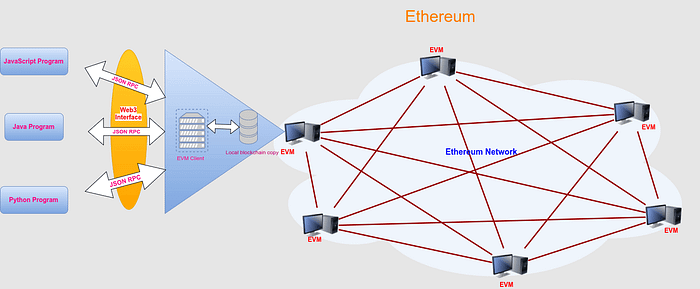
Here is an illustration, library helps connect with Ethereum:

Image credit: iotbl.
web3.py lets us communicate with the blockchain using JSON-RPC, allowing you to interact with the entire blockchain through that single connection. It’s like using a single access point to read data or send transactions to the network. With web3.py, you can easily check balances, call functions in smart contracts, or submit new transactions by communicating with a single node that shares data with the whole blockchain network.
Web3.py is well-suited for projects built using Python and has a user-friendly API that is easy to use. The library also supports synchronous and asynchronous programming, allowing developers to choose the most appropriate method for their projects.
One of the main advantages of Web3.py is its easy-to-use API. The library has a simple and intuitive interface that makes it easy for developers to interact with the Ethereum blockchain. JSON RPC Support make it easy to integrate Web3.py into existing projects, and it also makes it easy to test and debug your code.
How to use Web3.py?
To connect to a node on the mainnet/tetsnet using JSON-RPC, you need access to that blockchain node endpoint. This is where BuildBear comes in:
It provides a reliable and realistic testing environment with instant access to mainnet states with RPC URLs.
Unlimited token availability (ERC20 and Native tokens)
An explorer to debug and transaction traces
It provides a wide range of support for dev tools through its plugin architecture.
This setup simplifies the development process, making it easier and faster for developers to build and test applications.
Now let us see how to use the Python library with the BuildBear RPC URL.
Prerequisites
- Install Python 3.x
You can check the version of Python (Python 3.8+ recommended) installed in your system by running the below command on the terminal:
$ python3 --version
Install web3.py via pip.
BuildBear Account
To get started, create a Sandbox on BuildBear on the blockchain network. For this tutorial fork the Binance chain. If you’re new to BuildBear, create an account, and set up a Sandbox following our quick start guide.
Setting Up the Project
This project demonstrates how to use web3.py to interact with the PancakeSwap Lottery contract on the Binance Smart Chain. We’ll first go through basic web3.py functions to get familiar with common operations and then connect to PancakeSwap.
mkdir dapp && cd dapp
Create a virtual environment with Python and activate it.
python3.12 -m venv myenv source myenv/bin/activate
Install web3.py in your environment:
pip install web3
Connecting to BuildBear RPC
Open the project in VS Code editor. Create a file name demo.py. Add the following code to connect to BuildBear’s RPC and verify the connection, retrieve block numbers, and check your wallet balance. Replace with your wallet address to check balance. Use faucet to fund with test tokens.
from web3 import Web3
buildbear_url = "https://rpc.buildbear.io/prime-gorgon-3fe07045"
web3 = Web3(Web3.HTTPProvider(buildbear_url))print(web3.is_connected())
print(web3.eth.block_number)# Fill in your account here
balance = web3.eth.get_balance("0x9FE1b56E45c464616317eEA2663e691FbF79bE52")
print(web3.from_wei(balance, "ether"))
Run the Python file to get a similar output as follows:

Selling Tokens on PancakeSwap
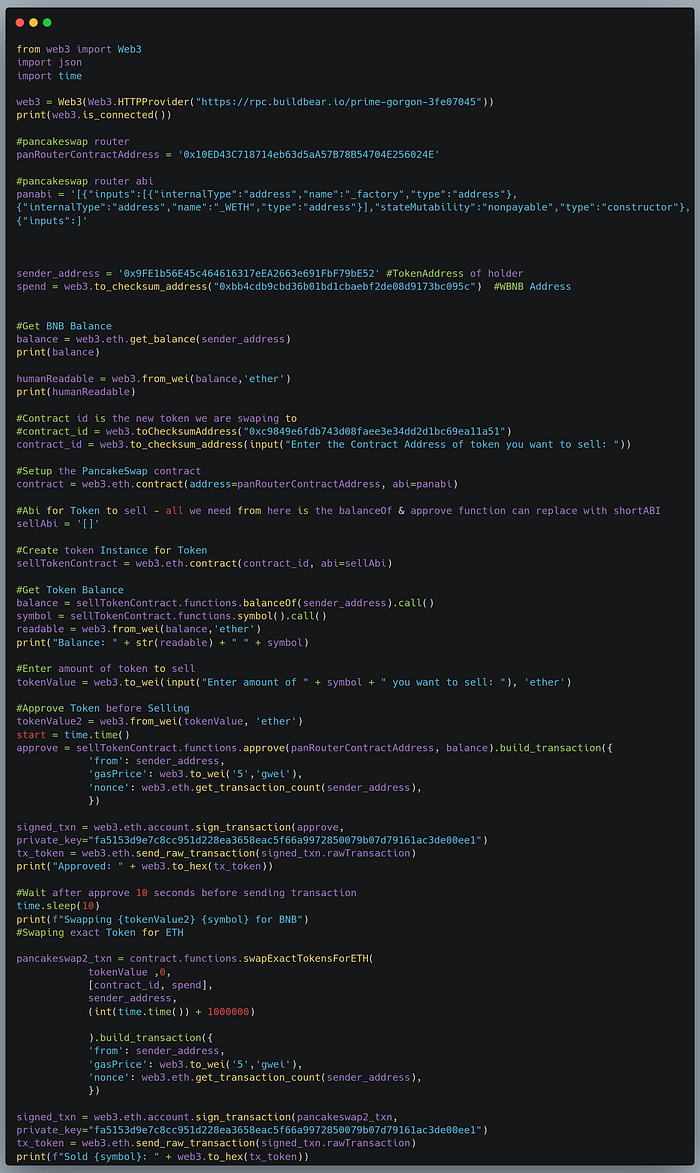
For the next part, let’s interact with the PancakeSwap router to sell tokens. We’ll connect to the PancakeSwap router contract and send a transaction to exchange tokens.
Use the below code to:
Initialize a connection with the BuildBear RPC to access the Binance chain
Set PancakeSwap Router Contract address
(0x10ED43C718714eb63d5aA57B78B54704E256024E) for token swap operations.Use PancakeSwap ABI, which defines how to interact with the contract functions.
Define sender’s address (The wallet holding the tokens you wish to sell) and token contract address(the token contract address you want to sell)
Note: Check sender’s BNB native token balance. Get test tokens from faucet to pay for gas fee for executing transaction.
Allow PancakeSwap to access your token by approving the
spendamount.Initiate Swap Transaction by calling the
swapExactTokensForTokensorswapExactTokensForETHfunction on the PancakeSwap router contract.
Specify parameters such as the token amount to sell, the minimum tokens you want to receive, and your wallet address as the receiver.
- Confirm the Transaction by monitoring the transaction status and confirm once it’s complete.
Note: Replace "YOUR_PRIVATE_KEY" with your actual private key for the wallet.

The output would look like:

Using PancakeSwap-lottery library
Let us use the pancakeswap-lottery library to provide access to key information in PancakeSwap's lottery contract. It can be installed from pip with the below command;
pip install pancakeswap-lottery
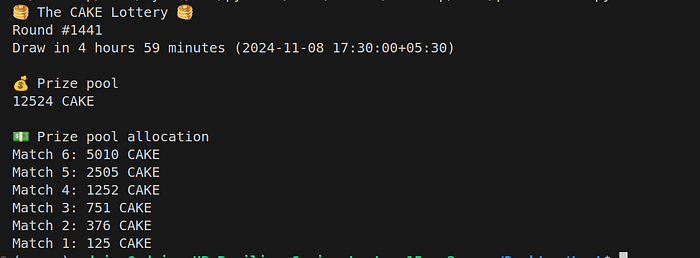
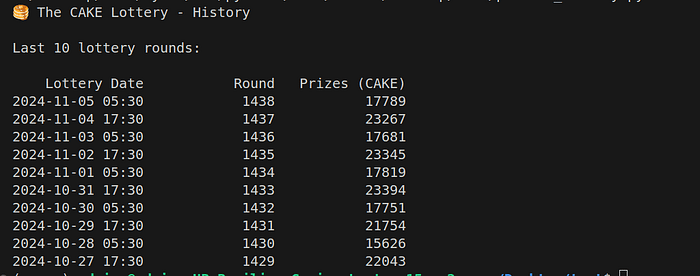
Now go to LotteryV2, and replace with your BuildBear RPC as the provider. Here are some examples of what you can do:
1. Get stats from the current lottery round.
Get the complete code from here.

2. Get lottery history data (Lottery Date, Round, Prize pool) from the last X rounds.

Conclusion
In this tutorial, we demonstrated how to set up a connection to BuildBear’s RPC with web3.py, retrieve blockchain information, and execute a token swap on PancakeSwap. With Web3.py support in BuildBear, you can simulate and automate interactions with smart contracts, analyze the results, and test your code in a controlled environment.
For further reading, check out web3.py’s official documentation.
About BuilBear:
BuildBear is a platform tailored for DApp development and testing. Developers gain the freedom to construct a personalized Private Testnet sandbox across a variety of blockchain networks. The liberty to mint unlimited Native and ERC20 tokens, coupled with rapid transaction times on BuildBear (under 3 seconds!), enhances the DApp development lifecycle manifold. The platform comes equipped with tools and plugins designed for real-time testing and debugging, ensuring developers can keep tabs on intricate blockchain transactions with unparalleled ease.
