The Ultimate Guide to Ethereum Development with Hardhat-Viem.

In Ethereum development, having the right tools is crucial for building robust decentralized Applications. You must be familiar with the Hardhat framework for managing the smart contract lifecycle from its creation to deployment and Interfaces like ethers.js are essential to connect dApps to the blockchain.
In this guide, we will delve into the fundamentals of Hardhat-Viem 2.0, exploring its features, benefits, and practical applications.
What is Viem?
Before delving into the Hardhat-Viem Plugin, let us first understand what Viem is.
Viem is a TypeScript Interface for Ethereum, developed by the team behind Wagmi. It is an alternative to ethers.js and web3.js focusing on reliability, efficiency, and developer experience. It differs from others by its modular and composable APIs and offers great developer experience.
Introducing Hardhat-Viem
Integration of the Hardhat framework with Viem provides a streamlined toolkit for building, testing, and deploying smart contracts with ease and a different way to interact with the Ethereum blockchain. This plugin integrates the Viem Ethereum library into your Hardhat development environment. By seamlessly integrating with your smart contracts, it eliminates the need to duplicate ABIs.
Hardhat-Viem allows for:
Interacting with Blockchain: Viem has a set of interfaces tailored for interacting with the blockchain, customized and auto-configured by hardhat-viem plugin to align with your Hardhat project requirement.
Interacting with smart contracts: It has the functionality to interact with smart contracts complemented by hardhat-viem's wrappers. it automatically generates types for your contracts, enhancing type-checking and providing IDE suggestions
Testing smart contracts: Hardhat-Viem offers testing capabilities to ensure the reliability and functionality of your smart contracts
These interfaces cater to specific interactions:
Public Client: Retrieves node information from the "public" JSON-RPC API.
Wallet Client: Facilitates transactions and message signing with Ethereum accounts.
Test Client: Executes actions exclusive to development nodes.
Let's get started with the new Hardhat-Viem project to interact with blockchain!!
Create a new Hardhat Project using ‘npx hardhat’ and Select the “Create a TypeScript project (with Viem)” option. If you are a novice follow the guide here to set up hardhat.

- To interact with blockchain let us create a ’scripts/clients.ts’ inside your project directory. Add the below code to the file. This script initializes wallets for Bob and Alice, checks Bob's balance, sends 1 Ether from Bob to Alice, and waits for the transaction to be confirmed
import { parseEther, formatEther } from "viem";
import hre from "hardhat";

async function main() {
  const [bobWalletClient, aliceWalletClient] =
    await hre.viem.getWalletClients();

  const publicClient = await hre.viem.getPublicClient();
  const bobBalance = await publicClient.getBalance({
    address: bobWalletClient.account.address,
  });

  console.log(
    `Balance of ${bobWalletClient.account.address}: ${formatEther(
      bobBalance
    )} ETH`
  );

  const hash = await bobWalletClient.sendTransaction({
    to: aliceWalletClient.account.address,
    value: parseEther("1"),
  });
  await publicClient.waitForTransactionReceipt({ hash });
}

main()
  .then(() => process.exit())
  .catch((error) => {
    console.error(error);
    process.exit(1);
  });
Go to hardhat.config.ts file and add the sandbox url under the network. Create a BuildBear sandbox by following this quick guide.
const config: HardhatUserConfig = { solidity: "0.8.24", networks: { buildbear: { url: ""//add your sandbox url } }, };- Run
npx hardhat run scripts/client.ts --network buildbear
- Run

Yey! We have successfully interacted with blockchain to transfer ether and reading balance.
Integrating hardhat-viem to an existing project
Let's try to integrate hardhat-viem into our existing project.
- Clone and install necessary dependencies
git clone https://github.com/sanamummer/hardhat-viem.git
cd Hardhat-Viem
npm install
- To install hardhat-viem, run
npm install @nomicfoundation/hardhat-viem
- Add the plugin to your hardhat config file
require("@nomicfoundation/hardhat-viem");
Create a SandBox, copy and paste the RPC URL to the config file under the buildbear network.
Use the script for deploying Smart Contract using viem
import { formatEther, parseEther } from "viem";
import hre from "hardhat";

async function main() {
  const currentTimestampInSeconds = Math.round(Date.now() / 1000);
  const unlockTime = BigInt(currentTimestampInSeconds + 60);

  const lockedAmount = parseEther("0.001");

  const lock = await hre.viem.deployContract("Lock", [unlockTime], {
    value: lockedAmount,
  });

  console.log(
    `Lock with ${formatEther(
      lockedAmount
    )}ETH and unlock timestamp ${unlockTime} deployed to ${lock.address}`
  );
}
main().catch((error) => {
  console.error(error);
  process.exitCode = 1;
});
- To deploy contract, run
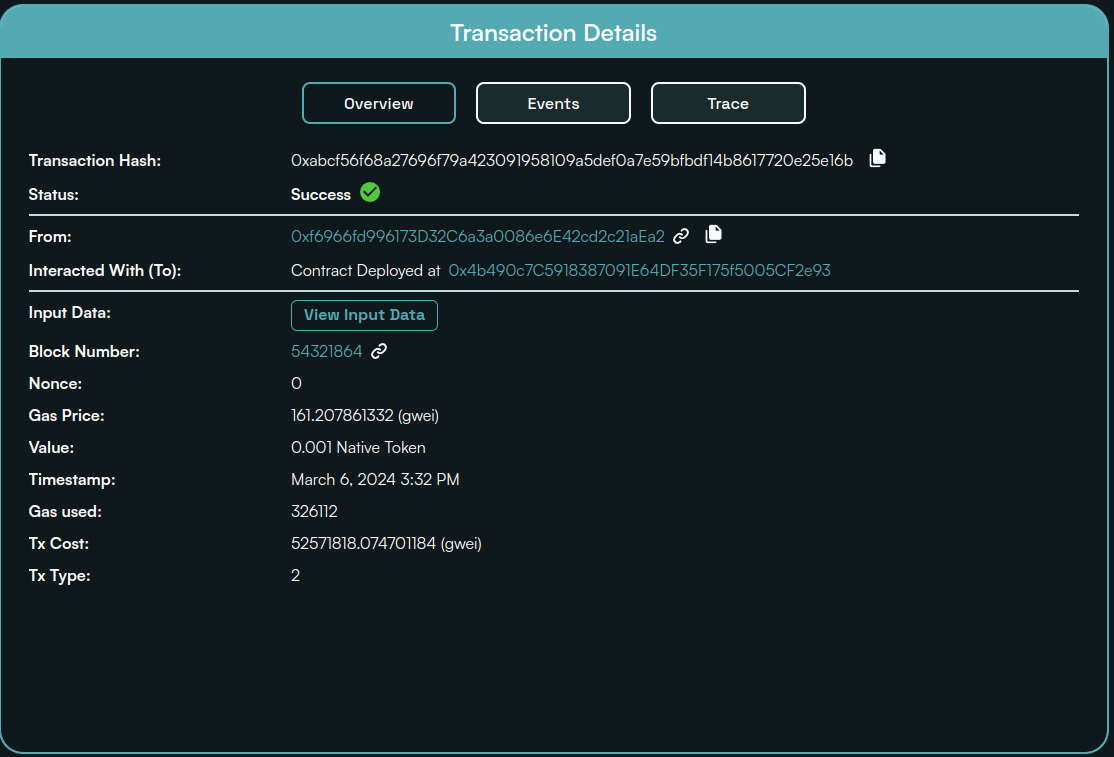
npx hardhat run scripts/deploy.ts --network buildbear
Congratulations! We just deployed smart contract using hardhat-viem plugin. See transaction details by navigating to the BuildBear explorer.
Conclusion
In conclusion, the integration of Hardhat framework with Viem offers a powerful toolkit for Ethereum smart contract development. With seamless integration and convenient helpers, Hardhat-Viem simplifies common use cases and eliminates the need to duplicate ABIs, leading to increased efficiency and productivity. By leveraging Viem's focus on composability, Hardhat-Viem provides a flexible and modular approach to development, allowing developers to build, test, and deploy smart contracts with ease.
BuildBear Tips:
Web3 Code Snippets: Need help with web3 libraries? BuildBear offers tailored code snippets for popular libraries like Web3.js, Ethers, Wagmi, Web3j, and Web3py, all customized to fit your Sandbox.
One-click Deployment: Effortlessly deploy 30+ of the most-used contracts with just a single click using BuildBear's no-code deployment feature.
Contract Verification: Configure your Hardhat or Foundry projects seamlessly with BuildBear-generated config file snippets, simplifying contract deployment and verification.
Phoenix Engine: Build secure dApps with Phoenix Engine seamlessly with innovative testing & validation tools to ensure their creations are rock-solid. ️
About BuildBear:
BuildBear is a platform for testing dApps at scale, for teams. It provides users with their own private Testnet to test their smart contracts and dApps, which can be forked from any EVM chain. It also provides a Faucet, Explorer, and RPC for testing purposes.
BuildBear aims to build an ecosystem of tools for testing dApps at scale for the teams.
Connect with us onTwitter | LinkedIn | Telegram | GitHub
Author: Sana


