Learn How to integrate UniswapV3 into your smart contracts.

What is Uniswap?
Uniswap was the first protocol to take DEX to the next level with an automated market maker (AMM). The AMM eliminates the need for a peer to make a trade, as is the case with traditional order books in today’s stock market. Instead, the AMM algorithm gathers liquidity deposited by liquidity providers, who place their assets and enable traders to use it.
How does the Uniswap protocol work?
With Uniswap, a trader can trade their ERC-20 tokens through pools. These pools consist of token pairs (e.g. USDC/WETH) and a pool fee (0.05%, 0.30%, or 1%). A pool collects a small amount of this fee to support the system. You can create and deploy your own pools, consisting of the pairs you pick and the pool fee you choose.
Let’s analyze the three main contracts involved in Uniswap V3: UniswapV3Factory, UniswapV3Pool and SmartRouter.
UniswapV3Factory:
◦ The UniswapV3Factory contract is responsible for creating instances of the UniswapV3Pool contract.
◦ It keeps track of the contract owner and controls the ownership and control over pool protocol fees.
◦ It maintains a mapping of fee amounts to tick spacings, which determines the granularity of price ranges.
◦ The createPool function is used to deploy a new UniswapV3Pool contract. It takes two token addresses and a fee amount as inputs and deploys a new pool contract for the specified token pair.
◦ It enforces certain conditions, such as ensuring the token addresses are not the same and that the tick spacing for the fee amount is valid.
◦ It updates the getPool mapping to associate the new pool contract with the corresponding token pair and fee amount.
UniswapV3Pool:
◦ The UniswapV3Pool contract represents an individual liquidity pool for a specific token pair and fee amount.
◦ It implements core functionality related to liquidity provision, fee calculation, and trading.
◦ Liquidity providers can deposit their tokens in the pool and receive liquidity provider (LP) tokens in return. These LP tokens represent their share of the liquidity pool.
◦ The UniswapV3Pool contract uses the concept of liquidity positions, which define a specific price range and the corresponding amount of liquidity provided.
◦ Liquidity positions are represented by unique tick values, which define the lower and upper price boundaries. The contract calculates fees based on these positions and distributes them to liquidity providers.
◦ Trading in Uniswap V3 involves swapping tokens between different price ranges, optimizing slippage and reducing capital requirements.
◦ The contract implements functions for swapping, minting/burning LP tokens, and withdrawing tokens from the pool.
SmartRouter:
The smart router contract is responsible for handling token swaps and liquidity management. It interacts with the Uniswap V3 Pool contract to perform these actions.
The contract calculates the optimal amounts for the swap using Uniswap v3’s pricing mechanism and routes the swap through one or more Uniswap V3 Pool contracts.
When integrating the UniSwap protocol into our contract, we have the option to integrate it from multiple contracts UniswapV3Pool, SmartRouter & UniswapV3Factory. However, for simplicity and to handle the complexity of calculating optimal swap amounts, we will be using the SmartRouter.
Implementation Example
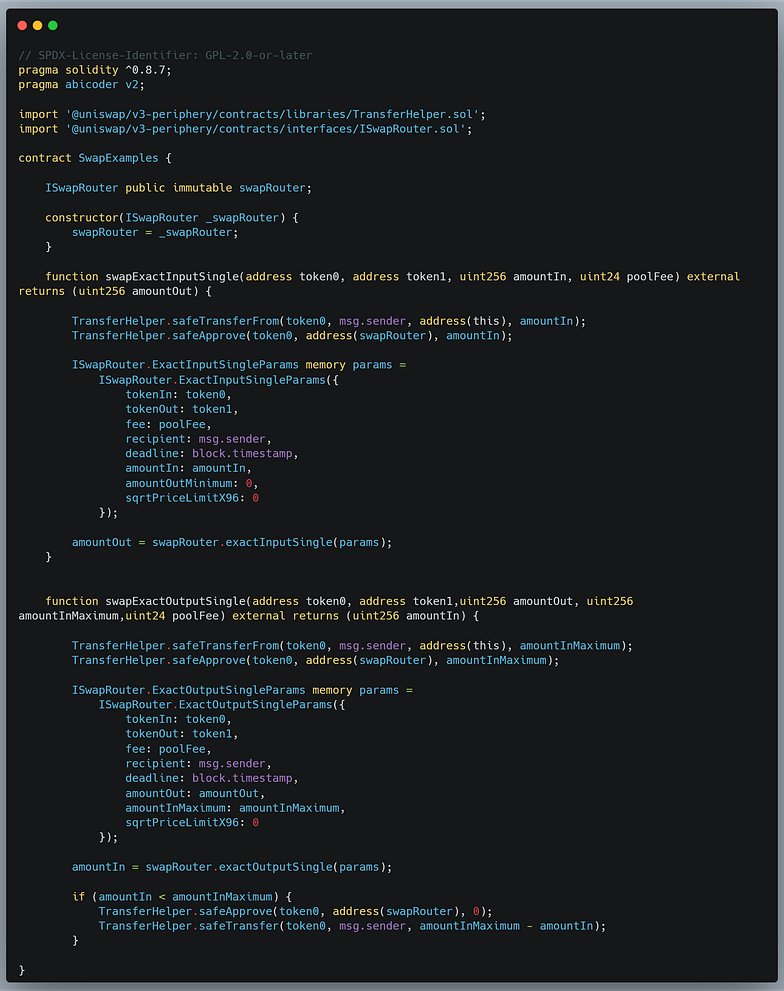
Let’s break it down:
Import Statements: The contract imports necessary external contracts from the Uniswap V3 Periphery, including
TransferHelperand the interface forISwapRouter. These external contracts are used for safely transferring tokens and interacting with the Uniswap V3 exchange.State Variables:
swapRouter: This is a state variable of typeISwapRouter, which is set to public and immutable. It stores a reference to the Uniswap V3 router contract, which is used to perform token swaps.Constructor: The contract has a constructor that takes an
ISwapRouterinstance as a parameter and initializes theswapRouterstate variable with it. This ensures that the contract interacts with the specified Uniswap V3 router.swapExactInputSingle Function:
This function is used for swapping an exact amount of input token for an output token.
It takes three parameters:
token0(input token address),token1(output token address), andamountIn(the exact amount of input tokens).Inside the function, it transfers the input tokens from the caller to the contract, approves the router to spend these tokens, and sets up parameters for the swap.
It then calls the
swapRouter.exactInputSinglefunction to perform the swap and returns the output amount.
5. swapExactOutputSingle Function:
This function is used for swapping for an exact amount of output token with a maximum amount of input tokens.
It takes four parameters:
token0(input token address),token1(output token address),amountOut(the exact amount of output tokens), andamountInMaximum(the maximum amount of input tokens).Similar to the previous function, it transfers input tokens, approves the router, and sets up swap parameters.
It then calls the
swapRouter.exactOutputSinglefunction to perform the swap. If the amount of input tokens used is less than the maximum allowed, it refunds the unused input tokens to the caller.
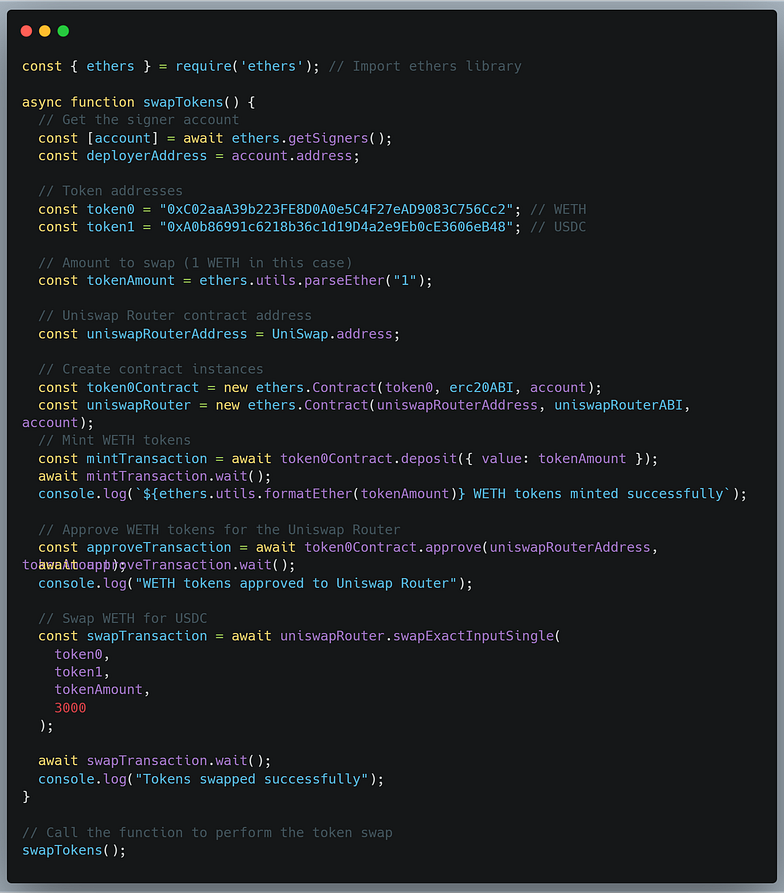
To get you started quickly we have set everything at BuildBear Labs Uniswap
- Clone/fork UniSwap:
git clone https://github.com/BuildBearLabs/UniswapV3.git
- Install dependencies
cd UniSwap
npm install
- Create your private testnet (forked from the Ethereum mainnet) we are forking Ethereum because we will be using Aave V3 Protocol
npm run createTestnet
Once the Testnet is live, its RPC, Explorer, and Faucet details are added to the testnet.json file.
- To deploy the
Swapexample.solsmart contract, run the following command:
npx hardhat run scripts/deploy-Swapexample.js

You can swap tokens using the provided script Swap-token.js
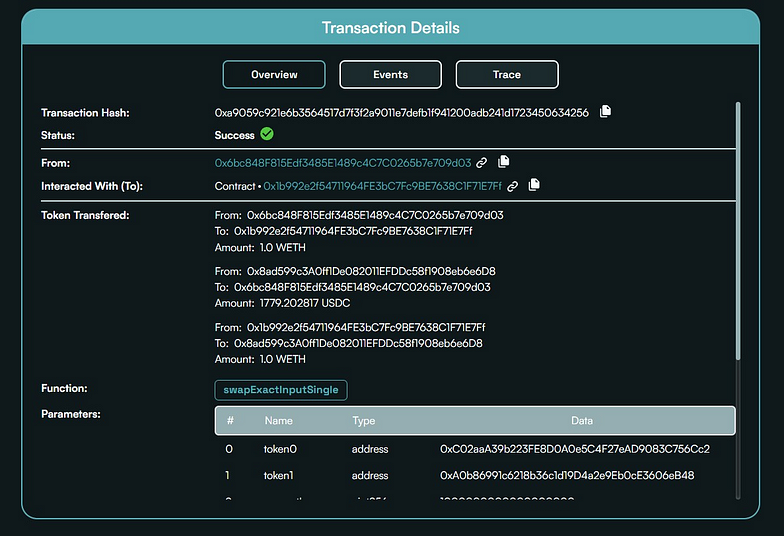
To run the scripts, execute the following command, and once the swap is successful, navigate to the contract explorer page. Click on the top transaction to view the swap transaction and the amount of USDC received, as shown in the image below:
npx hardhat run scripts/Swap-tokens.js

In conclusion, we’ve learned the roles of different contracts in Uniswap v3, and optimal way to integrate Uniswap v3 into our protocol, and how to swap tokens using scripts, eliminating the need for a frontend interface.
About BuildBear:
BuildBear is a platform tailored for DApp development and testing. Developers gain the freedom to construct a personalized Private Testnet sandbox across a variety of blockchain networks. The liberty to mint unlimited Native and ERC20 tokens, coupled with rapid transaction times on BuildBear (under 3 seconds!), enhances the DApp development lifecycle manifold. The platform comes equipped with tools designed for real-time testing and debugging, ensuring developers can keep tabs on intricate blockchain transactions with unparalleled ease.


