Create Rentable NFTs Using ERC-4907 Standard


In this tutorial, we will guide you through the step-by-step process of creating Rentable NFT smart contracts. If you are not familiar with the concept of rentable NFTs, Read this Article. Unlike other articles, this one will focus solely on practical development without theoretical discussions.
To help you get started swiftly, we have pre-configured everything for you. Let’s begin by cloning the repository.
Step 1: Cloning the Tutorial Repo
1.1 Forking the Tutorial Repository:
- Head over to our Tutorial Repository and click on the “Fork” button to create a copy of the repository on your own account. Wait for the forking process to finish before proceeding.
1.2 Cloning the repository locally:
Go to your forked repository on GitHub.
Click the “Code” button and copy the HTTPS or SSH URL.
Open your terminal or Git Bash.
Navigate to the directory where you want to clone the repository.
Run the below command to clone the Repo.
git clone <paste the URL you copied>
Wait for the cloning process to complete. Once it’s done, you should see a new directory with the name of the repository in the directory.
To move into the cloned repository, use this command
cd <Name of the cloned Repo>, then move to the RentableNFTs folder using this commandcd RentableNFTs.
Step 2: Developing the smart contract
There’s a lot to unpack here!
The contract imports two external libraries: ERC721 and Counters from the OpenZeppelin library. These libraries provide implementations for the ERC721 standard and a counter for generating unique token IDs.
First, let’s dive into the contract variables:
_tokenIdCounter: This is an instance of theCounters.Counterstruct from the OpenZeppelin library. It is used to generate unique token IDs for each minted NFT. The variable keeps track of the current token ID counter._users: This is a mapping that associates each token ID with aUserInfostruct. It stores the user and expiration information for each NFT. The keys are token IDs, and the values areUserInfostructs containing the user's address and the expiration timestamp.UserInfo: This is a struct that represents the user information for an NFT. It has two fields:user: The address of the user who has rented the NFT.expires: The Unix timestamp indicating when the user's rental period expires.
Next, we’ll go over the functions
setUser(uint256 tokenId, address user, uint64 expires): This function allows the owner or an approved address to set the user and expiration information for a specific NFT. It requires the caller to be the owner or approved to modify the NFT. The function takes three parameters:tokenId(the ID of the NFT),user(the address of the user who will rent the NFT), andexpires(the Unix timestamp indicating when the user's rental period expires). The function checks that the NFT doesn't already have a user assigned and that the expiration timestamp is in the future. If the conditions are met, the function updates the user and expiration information for the NFT and emits an "UpdateUser" event.userOf(uint256 tokenId): This function returns the address of the user who has rented a specific NFT. It takes thetokenIdof the NFT as a parameter. If the NFT has no user or the user's rental period has expired, it returns the zero address.userExpires(uint256 tokenId): This function returns the expiration timestamp for the user who has rented a specific NFT. It takes thetokenIdof the NFT as a parameter. If the NFT has no user, it returns the value zero.supportsInterface(bytes4 interfaceId): This function overrides thesupportsInterfacefunction from the ERC721 contract. It checks if the providedinterfaceIdis equal to the interface ID of the IERC4907 interface or if it's supported by the ERC721 contract. It returnstrueif the interface is supported, andfalseotherwise.nftMint(): This function allows the caller to mint a new NFT and assigns it to them. It increments the token ID counter, mints the NFT using the_safeMintfunction inherited from ERC721, emits the "NFTMinted" event with the caller's address and the token ID, and returns the token ID of the minted NFT._beforeTokenTransfer(address from, address to, uint256 tokenId, uint256 batchSize): This internal function is invoked before a token transfer occurs. It is called by the ERC721 contract. It checks if the user information for the token is present and if the user's rental period has expired. If both conditions are met, it deletes the user information for the token and emits an "UpdateUser" event with the zero address and zero expiration timestamp.totalSupply(): This function returns the total number of NFTs that have been minted. It retrieves the current value of the token ID counter and returns it as the total supply of NFTs.
Step 3: Getting up the infra needed to deploy and test our smart contract
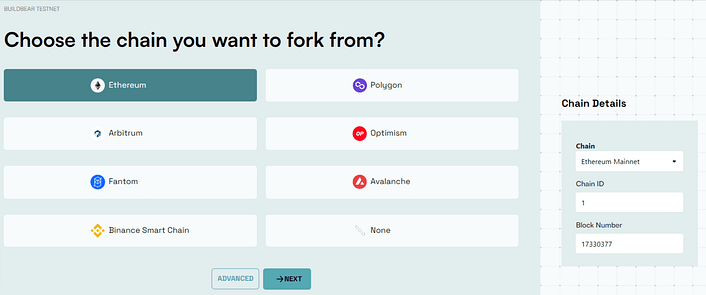
3.1. Visit the BuildBear App (why BuildBear: Read article here).
3.2. Create your Private Testnet forking from the Ethereum Mainnet, feel free to fork any Chain.
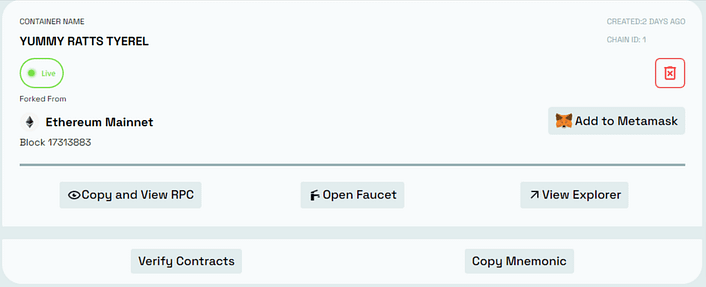
3.3. Add your Private Testnet to your MetaMask wallet by using the “Add to Metamask” button:
Step 4: Deploying the Smart Contract
For installing the necessary packages, please execute the following command.
npm install
4.1 Update thehardhat.config.js .
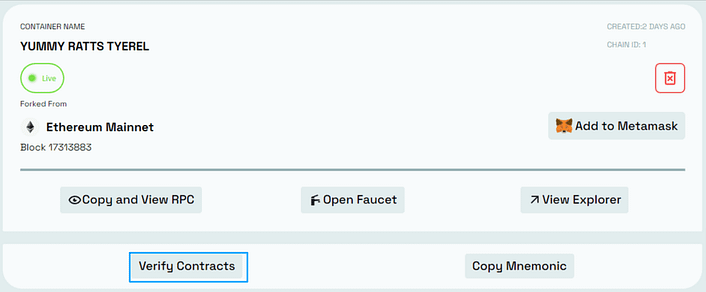
- Head to your Dashboard and click on “verify contract”.
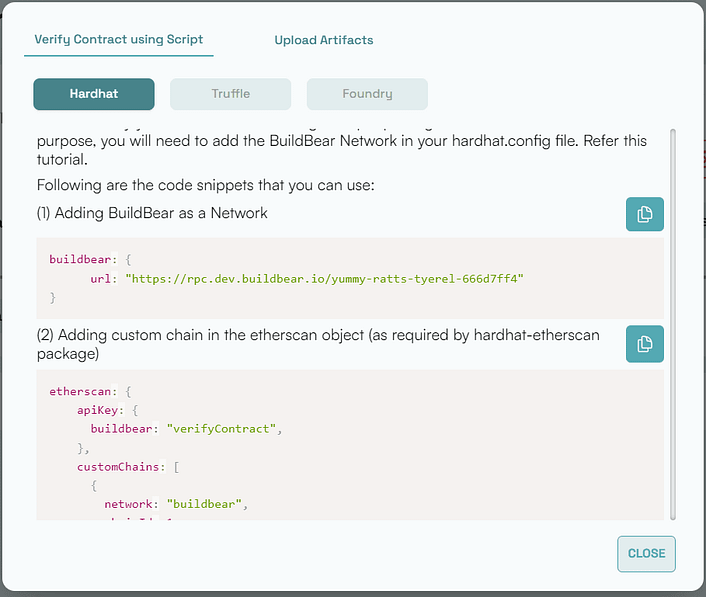
- Copy the BuildBear and Etherscan objects, and update the
hardhat.config.jsfile.
4.2 To deploy the RentableNFTs.sol the smart contract runs the deploy command. npx hardhat deploy This will run the deployment and verification scripts in deploy/00_deploy_rentable.js, and saves the deployment details along with ABI and Contract address in the deployments folder.
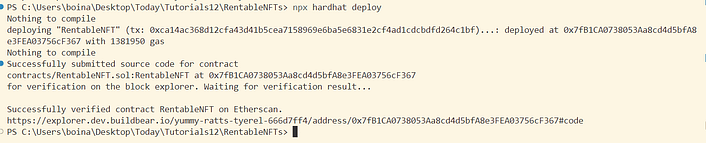
- Click on the link provided in the terminal to see the Contract on Explore page.
WOOT WOOT 🎉 🎉
4.3 Minting and Renting an NFT.
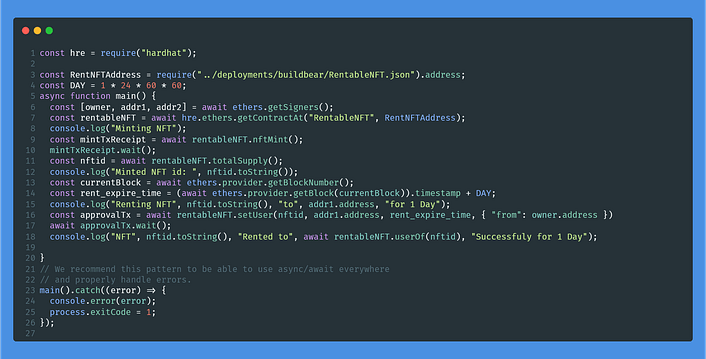
In this script, we mint a new NFT by calling the nftMint() function of the contract and retrieving the ID of the minted NFT.
Then, it calculates the expiration time for renting the NFT, which is set to one day from the current block’s timestamp.
The script assigns the rented NFT to a specific address using the setUser() function, indicating the address and expiration time.
Finally, it confirms the successful rental by checking the assigned user of the NFT and prints a message indicating the successful rental.
The script is configured in the scripts/mintandrent.js . To execute the scripts, please run the following command.
npx hardhat run scripts/mintandrent.js

NFT has been successfully minted and Rented to the User.
Step 5: Testing the smart contract
Testing smart contracts is a crucial aspect of the development process to ensure that the contracts function correctly and are error-free. In this section, we are going to test the smart contract whether it is working as intended or not.
Navigate to the Rentnft.test.js file in the test folder.
In each test case, the code is testing the following:
Minting NFT:
The test case mints 1 NFT using the
nftMint()function of the contract.It then checks the balance of the user by verifying the total supply of NFTs using the
totalSupply()function, expecting it to be equal to 1.
Renting an NFT:
The test case mints 1 NFT using the
nftMint()function of the contract.It calculates the expiration time for renting the NFT and assigns it to a user using the
setUser()function.Finally, it checks whether the assigned user of the NFT matches the expected address.
Renting the same NFT twice:
The test case mints 1 NFT using the
nftMint()function of the contract.It calculates the expiration time for renting the NFT and assigns it to a user using the
setUser()function.Then, it tries to rent the same NFT to a different user again, expecting the transaction to be reverted with the error message “User already assigned”.
User NFT transfer:
The test case mints 1 NFT using the
nftMint()function of the contract.It calculates the expiration time for renting the NFT and assigns it to a user using the
setUser()function.It attempts to transfer the NFT to another user, expecting the transaction to be reverted with the error message “ERC721: the caller is not token owner or approved”.
NFT rent expires:
The test case mints 1 NFT using the
nftMint()function of the contract.It calculates the expiration time for renting the NFT and assigns it to a user using the
setUser()function.It checks whether the expiration time of the NFT is less than one day (the specified duration).
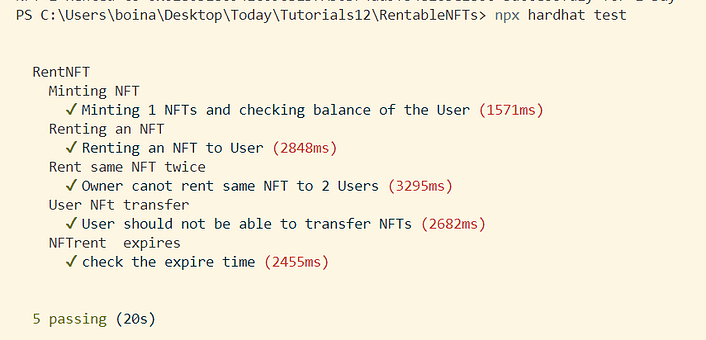
These test cases cover different aspects of the “RentableNFT” contract, including minting NFTs, assigning them to users for rent, preventing double rentals, restricting user NFT transfers, and checking expiration times.
To run all the tests in your project, open your terminal and type the following command:
npx hardhat test
This command will execute each test case in the project and output the results to the terminal.
If all tests pass successfully, you should see a long list of passing test results displayed in the terminal, like the example shown below:
If you appreciate what we are doing, please follow us on Twitter, and LinkedIn and Join the Telegram group if you haven’t done yet.
And please give us a clap 👏 if you like our work.
Github Repo : Buildbear Tutorials
About BuildBear:
BuildBear is a platform for testing dApps at scale, for teams. It provides users with their own private Testnet to test their smart contracts and dApps, which can be forked from any EVM chain. It also provides a Faucet, Explorer, and RPC for testing purposes.
BuildBear aims to build an ecosystem of tools for testing dApps at scale for the teams.
Authors: Chandan