

Building a Decentralized NFT Marketplace with Solidity and Hardhat: A Step-by-Step Tutorial


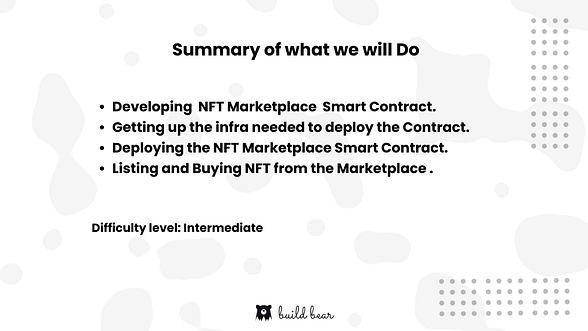
In this Tutorial, We’ll go through the process of building the smart contracts that hold the business logic for our NFT marketplace.
Step 1: Cloning the Tutorial Repo
1.1 Forking the Tutorial Repository:
- Head over to our Tutorial Repository and click on the “Fork” button to create a copy of the repository on your own account. Wait for the forking process to finish before proceeding.
1.2 Cloning the repository locally:
Go to your forked repository on GitHub.
Click the “Code” button and copy the HTTPS or SSH URL.
Open your terminal or Git Bash.
Navigate to the directory where you want to clone the repository.
Run the below command to clone the Repo.
git clone <paste the URL you copied>
Wait for the cloning process to complete. Once it’s done, you should see a new directory with the name of the repository in the directory.
To move into the cloned repository, use this command
cd <Name of the cloned Repo>, then move to the nftmarketplace folder using this commandcd nftmarketplace.
Step 2: Developing the smart contract
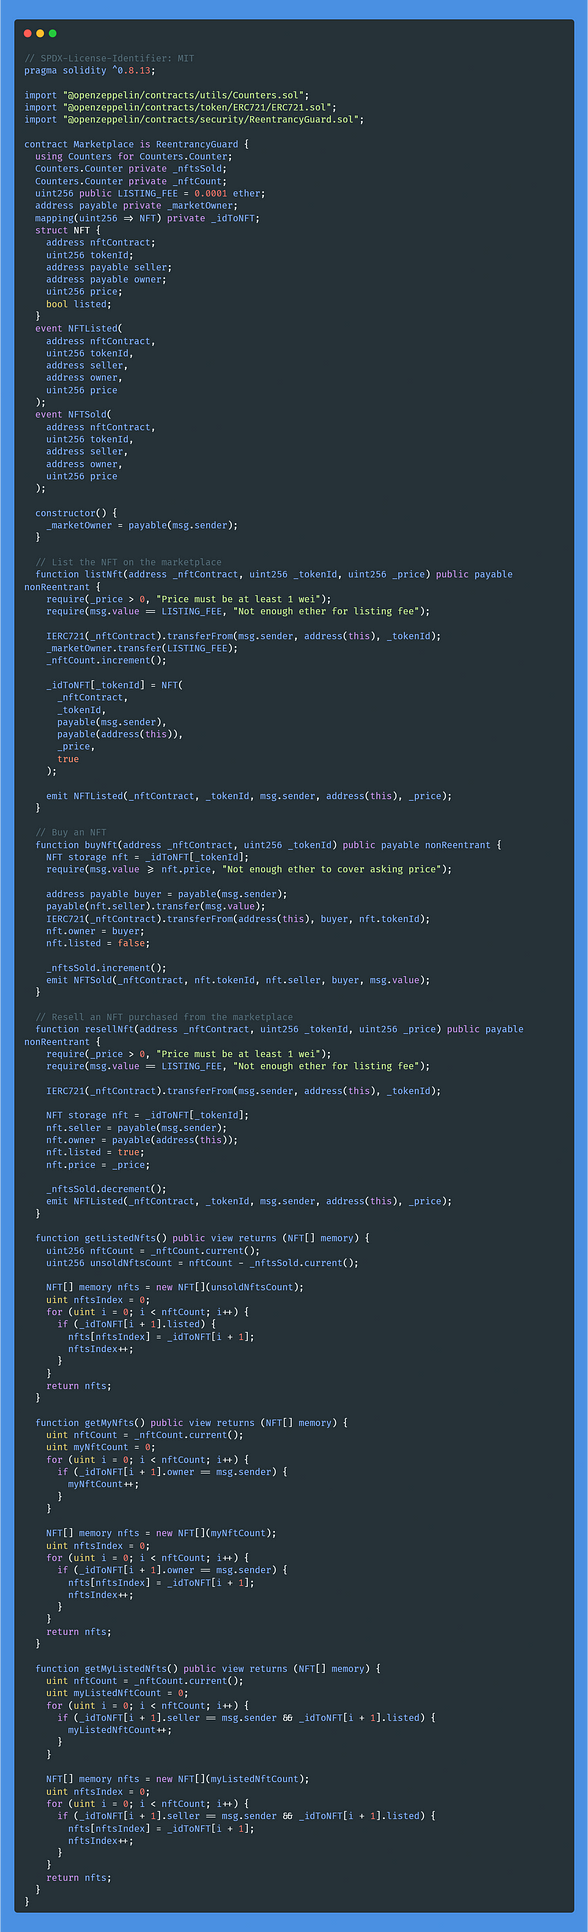
There’s a lot to unpack here! You might notice that the Marketplace contract inherits ReentrancyGuard. We do this so that we can defend against reentrancy attacks.
First, let’s dive into the contract variables:
Counters.Counter private _nftsSoldincrements when a NFT is sold and decremented when a NFT is relisted.Counters.Counter private _nftCounttracks how many NFTs have been listed.uint256 public LISTING_FEEis taken from the seller and transferred to the marketplace contract owner whenever an NFT is sold.address payable private _marketOwnerstores the Marketplace contract owner, so that we know who to pay the listing fee to.mapping(uint256 => NFT) private _idToNFTassociates the unique tokenId to a the NFT struct.struct NFTstores relevant information for an NFT listed in the marketplace.event NFTListedis emitted every time a NFT is listed.event NFTSoldis emitted every time a NFT is sold.
Next, we’ll go over the functions that will alter state:
listNftis called when a user first mints and lists their NFT. It transfers ownership from the user over to the Marketplace contract.resellNftallows users to sell an NFT that they purchase on the marketplace.buyNftis called when a user buys an NFT. The buyer becomes the new owner of the NFT, the token is transferred from the owner to the buyer, and the listing fee is given to the marketplace owner.
Finally, the query functions are relatively straightforward:
getListedNftsretrieves the NFTs that are currently listed for sale.getMyNftsretrieves the NFTs the user has bought.getMyListedNftsretrieves the NFTs the user has listed for sale.
We will also be using a Basic NFT smart contract for testing the NFT marketplace, available in the contracts folder.
Step 3: Getting up the infra needed to deploy and test our smart contract
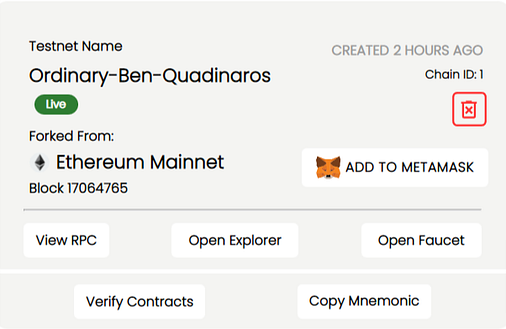
3.1. Visit the BuildBear App (why BuildBear: Read article here).
3.2. Create your Private Testnet forking from the Ethereum Mainnet, feel free to fork any Chain.

3.3. Add your Private Testnet to your MetaMask wallet by using the “Add to Metamask” button:
Step 4: Deploying the Smart Contract
For installing the necessary packages, please execute the following command.
npm install
4.1 Update thehardhat.config.js .
- Head to your Dashboard and click on “verify contract”.
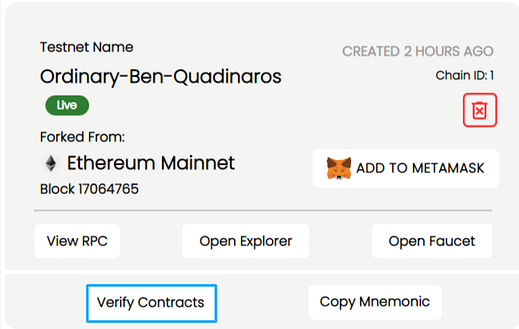

- Copy the BuildBear and Etherscan objects, and update the
hardhat.config.jsfile.
4.2 To deploy the NFTMaeketplace.sol and basicNFT.solsmart contract runs the deploy command. npx hardhat deploy This will run the deployment and verification scripts in deploy/00_deploy_mainContract.js, deploy/00_deploy_basicNft.js and save the deployment details along with ABI and Contract address in the deployments folder.
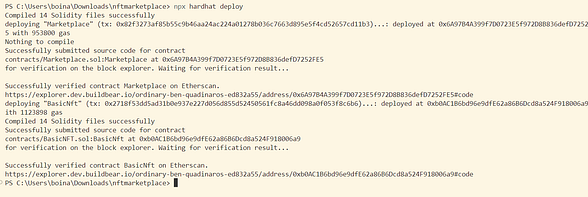
- Click on the link provided in the terminal to see the Contract on Explore page.
WOOT WOOT 🎉 🎉
4.3 Mint and listing an NFT on the marketplace.

The scripts for Mint a basic NFT and listing the NFT on the Marketplace have already been configured in the scripts/mintAndListNFT.js file, as demonstrated above. To execute the scripts, please run the following command.
npx hardhat run scripts/mintAndListNFT.js

NFT has been successfully minted and is listed on the NFT Market Place.
4.4 Buying the listed NFT
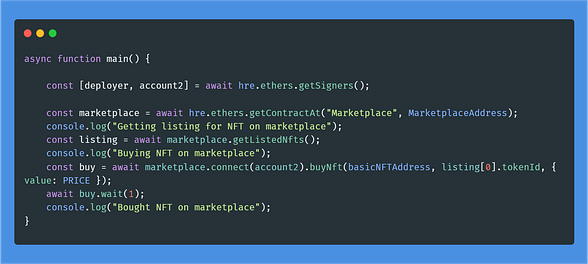
The scripts for Buying an NFT on the Marketplace have already been configured in the scripts/buyNFT.js file, as demonstrated above. To execute the scripts, please run the following command.
npx hardhat run scripts/buyNFT.js

We have successfully brought the NFT.
We have successfully built an NFT Marketplace, deployed it, Listed an NFT, and brought it through another account !!! 🎉🎉🎉
Share your project on Twitter and LinkedIn and tag BuildBear.
If you appreciate what we are doing, please follow us on Twitter, and LinkedIn and Join the Telegram group if you haven’t done yet.
And please give us a clap 👏 if you like our work.
Github Repo : Buildbear Tutorials
About BuildBear:
BuildBear is a platform for testing dApps at scale, for teams. It provides users with their own private Testnet to test their smart contracts and dApps, which can be forked from any EVM chain. It also provides a Faucet, Explorer, and RPC for testing purposes.
BuildBear aims to build an ecosystem of tools for testing dApps at scale for the teams.
Authors: Chandan